Tuesday, November 24, 2015

Art with Heart Challenge Sewing Themed

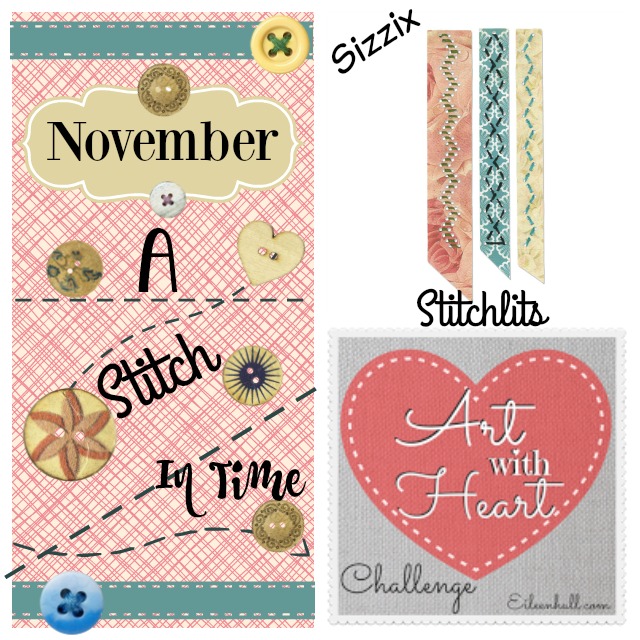
Hello everyone it’s time for a new Art with Heart Challenge!  This November the Inspiration Team and Eileen are celebrating the new Sizzix collection Stitchlits!  This collection is sewing themed and features new Thinlits, Bigz, Scoreboards and Scoreboards XL dies for you to create sewing themed Sizzix projects with.  Check out the entire Stitchlits Collection HERE.  Our theme this month is “A Stitch in Time”.  You can interpret that theme however you like just show us your oh-Sew-crafty projects for a chance to win some of my new Stitchlits Sizzix dies.  

Art with Heart November Challenge Introducing Sizzix Stitchlits | Eileenhull.com
I decided to use a new embossing folder - Sew Happy!
You can see it HERE
 Emboss your paper and pick out your Embroidery floss! It is as easy as that!
All you have to do is get comfy in a chair in front of the TV and stitch away!
This is SEW relaxing!

 I used crossed stitch and straight stitch. Nothing to fancy.
I do recommend to use two threads. I tried three and it did tend to rip the paper a bit.
 Once your done you can frame or make it into a card! This would be great to give to give as a card to that quilter or sewing friend! They would cherish it for sure!


This was so relaxing! I am going to have fun with this line!

I also have been playing with Eileen's new Stitchlit flowers and hoop! Oh my!
Sew fun! Using fabric and paper is so fun! How cure is this!!!!


You can check out the entire Stitchlits Collection HERE and be sure to check with your local retailers about Stitchlits and other Eileen Hull Dies!

Remember always a prize every month! Enter your projects before it's to late!
Go here to add you projects!

Friday, November 13, 2015

Fall Candy Boxes

FALL CANDY BOXES

glue-dots-fall-box-feature
Designer Donna brings the fall foliage inside with fall candy boxes. Fill with treats or something special and give to your neighbors, friends, co-workers, or teachers.
Designed by: Donna Budzynski
Time: 1 hour for 6 boxes
Level: Beginner
Here’s what you need:
  • Glue Lines®
  • Ultra-Thin Glue Dots®glue-dots-fall-box-supplies
  • Twine
  • Cardstock – fall colors
  • Sizzix Little Sizzles Mat Board or small boxes
  • Distress ink – peeled paint, spiced marmalade, vintage photo-Tim Holtz
  • Archival Ink Wendy Vecchi – Potting Soil
  • Small Candy Bags (Optional)
  • Die Cut Machineglue-dots-fall-box
  • Die Cuts – Leaves
  • Die Cut 3D Block/Cube by Eileen Hull
  • Background Stamp – Something to add interest
  • Ink Blending tool
Here’s what you do:
  1. Die cut boxes (using Mat Board) and leaves (cardstock).
  2. Stamp background on all boxes using Archival Ink.
  3. Distress ink all boxes and leaves using blending tool.glue-dots-fall-box-complete
  4. Adhere boxes together using Glue Lines.
  5. Cut off the top flap of the box, so the box is open (optional).
  6. Adhere leaves to the front of the boxes using Ultra-Thin Glue Dots.
  7. Tie twine around the boxes as desired.
  8. Fill bags with candy of choice or peanuts.
**Use these for place settings by adding names to the leaves.
**Also write words of “Thanks” on leaves.
**Or just randomly place around the house for decorations with snacks.
~Donna
Any format of Ultra-Thin Glue Dots can be used:
ultra-thin-glue-dots

Thursday, November 5, 2015

Wooden Snowman made with Glue Dots®


glue-dots-wooden-snowman-feature

Designed by: Donna Budzynski
Approximate time: 1 Hour
Level: Beginnerglue-dots-wooden-snowman-supplies
Size: 6” X 36”
Here’s what you need:
  • Glue Dots® Advanced Strength
  • 1 slat from a wood pallet or a board 1” x 36”glue-dots-wooden-snowman-inprocess
  • 1 slat cut to 14” – approximate size 3” x 14”
  • Small wood triangle for nose
  • Misc. buttons
  • Paint – White, burnt orange, black
  • Fabric or old scarf
  • Paint brushes
  • Table sawglue-dots-wooden-snowman-finished
Here’s what you do:
  1. Cut all wood to size yourself or have your local home improvement store cut it for you (they should cut it for free if you purchase the wood from them).
  2. Paint the top quarter of the 36″ plank black.  Paint the remainder of the wood slat white and let dry completely.
  3. Paint the skinny 3″ x 14” slat black and let dry.  This will be the brim of his hat.
  4. Paint nose burnt orange and let dry.
  5. Using Glue Dots Advanced Strength adhesive, assemble snowman by adhering the brim, nose, and buttons to the board. Tip: place items in position until you are happy with the look of your snowman. Add Advanced Strength adhesive to the back of each item and press firmly into place for a strong secure bond.
  6. Tie scarf around the plank where the snowman’s neck would be.
  7. Paint mouth and let dry.
~Donna
To complete this project either format of Advanced Strength will work:
advanced-strength-glue-dots