Showing posts with label Deco Art Media paints. Show all posts

Thursday, July 28, 2016

Gel Press and Resin Paper Art


Welcome to the ETI/Gel Press Blog Hop!

The designers for both companies have been creating wonderful projects. Please leave a comment on EACH blog. Tell us on the Gel Press blog and on the Resin Crafts blog as to which projects you found most interesting or inspiring. One winner will be picked, at random, Sunday, July 31, 2016, at 10pm CST. The winner will get both Petite sets of Gel Press plates and ETI Jewelry Resin! Hop now through Sunday! Winner must be 18 or over and live in the USA. 

Good Luck!

Today I am going to show you how to make Resin Paper using ETI EnviroTex Lite® and 
a 5" X 7" Gel Press printing plate and turn it into a piece of ART.


Supplies Needed:
Paper
Embroidery thread
Eyelets
Beacon Mixed Media Adhesive
Foam Squares
Mat board

Tools:
Crop-a-dile or hole punch
Acrylic Paints - DecoArt Media
Brayer
Garbage bag
Paint brush
Paper Trimmer

Let's get started......

Apply some paint onto Gel Press.


Run brayer across paints.


Put paper over the top of the Gel Press with the paint and firmly rub over the top of your paper and make sure you smooth across the page to get your paints onto the paper to make your print.


Here are three prints I made using my Gel Press-do you see what I see?
(I am seeing a lady in two of the prints and a heart in the other)

I set the prints aside to dry and cleaned my Gel Press Plate and brayer. Super easy to clean!


Once your prints are dry, it is time to mix up the EnviroTex Lite® following
the manufacturer's directions. I used a garbage bag on my table for protection and to be able to pull the resin paper off when done. Make sure to protect you surface you are working on.


Add equal amounts of part A and part B


Pour A into B and mix for 2 minutes


Now pour into other cup to pick up any left over hardener and mix for 1 more minute.


Brush on a very thin layer of resin.


Flip paper over and brush on the back side.


Flip to the front side and brush out any bubbles or folds. The backside will dry and have the impression of the garbage bag. This is not a big deal as you won't see it. Let dry 24 hours and peel off.

The paper is ready to work with. It is flexible.

I tore my edges to start.


Trim your mat board and background paper to fit mat board using paper trimmer.


Tear cream paper and adhere down to the base paper using Beacon Mixed Media Adhesive.


Using a hole punch or Crop-a-dile punch holes and set eyelets.


Put embroidery floss through eyelets.


Adhere foam pop ups onto back of print.


Adhere to white/cream paper. Using double sided Acid free tape adhere the floss to the back of the base paper. Adhere base to mat board using Beacon Mixed Media Adhesive.

Enjoy your new piece of ART-

I am calling this Heart Strings!

I did also made a quick necklace out of a piece that was leftover after I tore the paper.

Here it is.


Make sure to visit all of the designers!


Tuesday, June 21, 2016

Eileen Hull and Crescent Framed Together!

Eileen Hull and Crescent Collaborate!


Today I have chosen to work with Crescent Photo Mat Art Board.
Eileen's new Flower - Heart & Soul
You will also need:
Crinoline fabric
Deco Art Media products
Card stock - I used Tim Holtz
Stencil
Beacon Fabri-Tac adhesive
Distress ink - Vintage Photo


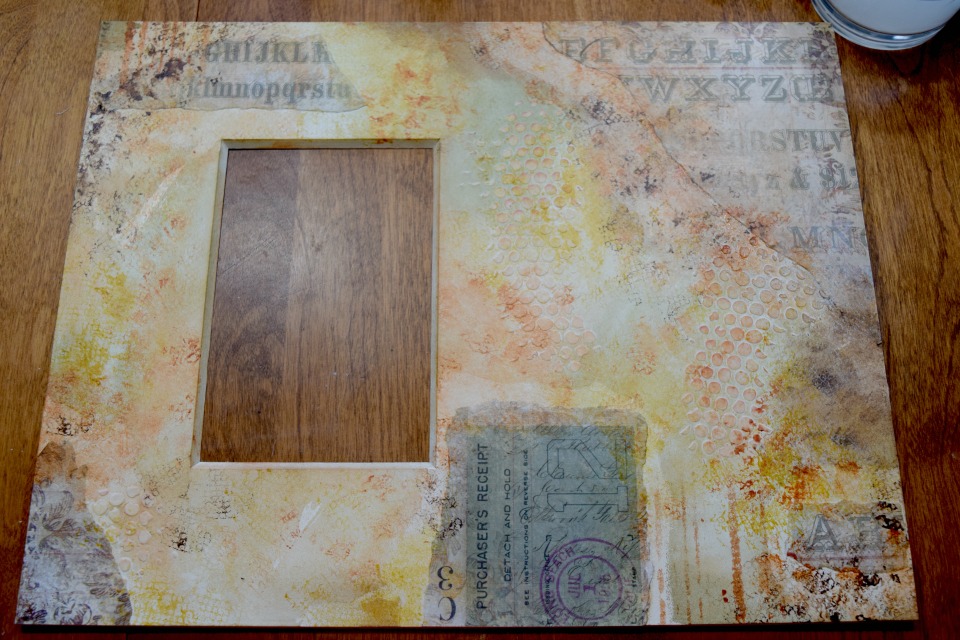
Using a stencil and DecoArt Media Modeling Paste, add some texture onto the Mat Art Board


Tear some paper and place on Art Board, move them around till they appeal to you
Using DecoArt Matte Medium adhere the torn papers to the Art Board

Here is mine

I decided to add some distress inks. Now set aside to let the Modeling Paste dry

Let's make flowers!
Love, LOVE, Love these new flower dies!
I am mixing new with the old. Really, the old are not that old!
Using Crinoline fabric cut out a bunch of flowers using the die Heart & Soul and the 
Thinlits Flower & Leaf Stitchlits


I made 2 large flowers and 4 small flowers


Lots of petals used. I wanted the flowers to really be full. This flower I used the sepal as a center to make it look like it is still opening


Adhered the 3 petals together and then the next three loosely adhered


Finished flower is GORGEOUS!

I also crumble the cuts to make the flowers look fuller.


Let's get our paint on to this Art Board.

I am using these colors for my palette.

I just lightly applied the fluid acrylics with a damp paper towel. I kept applying until I felt it was finished.
I used the computer to print out my saying and distressed the paper and inked it and adhere it to the Art Board using pop dots.

I adhered the flowers on with Beacon Mixed Media adhesive.

I also added a key hole  and some beautiful gems to the piece.

I still felt it was not done and added some distress inking using Tim Holtz's distress ink Vintage Photo


I have to say, I LOVED the way the paints and mediums went on to the Crescent Art Mat Board. I did receive this free as part of the collaboration but, in my opinion this is a great substrate to work with and I enjoyed working with it very much and would use it again and recommend it!

Once I was in LOVE with my piece, I added a vintage photo of my grandparents.


Popped it in a frame and it is Stunning, if I do say so myself!


Make sure you check out what the other DT members have done this month. Go to Eileen Hull blog to check it out!

Friday, May 20, 2016

Father's Day Pencil Holder

Hi guys-I am back with Makin's Clay®

I have made a Father's Day Pencil Holder!

Head over to the blog and learn how to make it!

Makin's Clay® Blog


Thanks for stopping by!

Tuesday, April 7, 2015

Road Less Traveled-Art with Heart Challenge


This month at Art with Heart we are showing off Eileen Hull's new Sizzix's Travel line. You can see them HERE!

                                   
I love the little travel trailer die!
 So Adorable!


Many of you know and some may not, Eileen has traveled with her cute little Scotty Trailer! That is what has inspired this new line! You can hear about it HERE!

So in my dream world I would love to get a vintage trailer and glam it up! That would be so FUN!

Not in my cards right now.........

Sooooooo.........for this month I am going to do 2 posts. Today's post which includes my just bought (wink, wink) rusty broken down trailer. On the 21st of this month I will show you my vintage camper redone! 

So on with how I did this!

1st I have taken corrugated cardboard and ripped off the front paper to expose the inside. I left some of the thin paper on, I wanted to give extra the appearance of peeling paint and rust.


 Once peeled, I adhered it to the base camper.

 Now for some creative fun!

I took out my Deco Art media paints. Have you tried these? They are amazing! I was a avid user of Golden and I have to say I am liking/loving these Deco Art media Fluid Acrilycs. Just an FYI for you!

I started to base coat my camper to make it look like it has been back in the woods, neglected, rusty and forgotten about. (Still my dream!)
So my first coat was with Deco Art media Fluid Acrylics-Medium Grey Volume 6. Not a real heavy coat as you can see below. Then on the lower portion of my soon to be rusty trailer I used Deco Art media Fluid Acrylic-Cobalt Teal Hue. (Gorgeous color, FYI) Again not a heavy coat.

Now the next coat was Deco Art media Fluid Acrylic-Quinacidone Gold. As you can see in the picture below I started in a few areas in the upper and lower sections. Heavier in some areas and lighter in others. I used some Deco Art media Fluid Acrylic in Carbon Black and just light stroked some on. I truly think I could have skipped this step as I was putting Deco Art Antiquing Cream Black over it. But this is how I was taught long before I met with Antiquing Cream!

Once you have every inch of your trailer to your liking you will add Deco Art Antiquing Cream Back all over it. Let dry and wipe back to where you want your trailer to look like. (Follow manufacturers directions)


As you can see in the pictures, I left areas just as I started with the corrugated cardboard shows through.

I cut a piece of mat board and painted it with Deco Art Fluid Acrylics to make it look like a pallet wood sign. Nailed a real nail into the camper and hung my sign. I also cut a door out of mat board and used the same technique on it as the camper.


 Then broken down camper had to have a flat tire! So I took the good round tire that you cut with your die and folded it, crumpled it to make it look worn and FLAT!
 Just a close up of the chippy, rusty camper with a flat tire and the wood 4 sale sign. You can see in this picture where I left some of the paper on and it gives it a great textured look of chipping paint, rust falling off.

 So with the help of Eileen's Vintage Camper die and Deco Art media Fluid Acrylics my dream of owing a rusty old camper has come true!

Never stop dreaming!

Remember to return on the 21st of April to see what my (dream) vintage camper will look like!

If you would like to join us with this months challenge, enter your link HERE!